
WiFi Analyzer for Windows PC
Scan nearby networks, find the least crowded channel, and fix dead zones. See exactly what your WiFi is doing with real-time signal graphs.
What Is WiFi Analyzer?
A free Windows diagnostic tool that shows you exactly what your wireless network is doing, channel by channel.
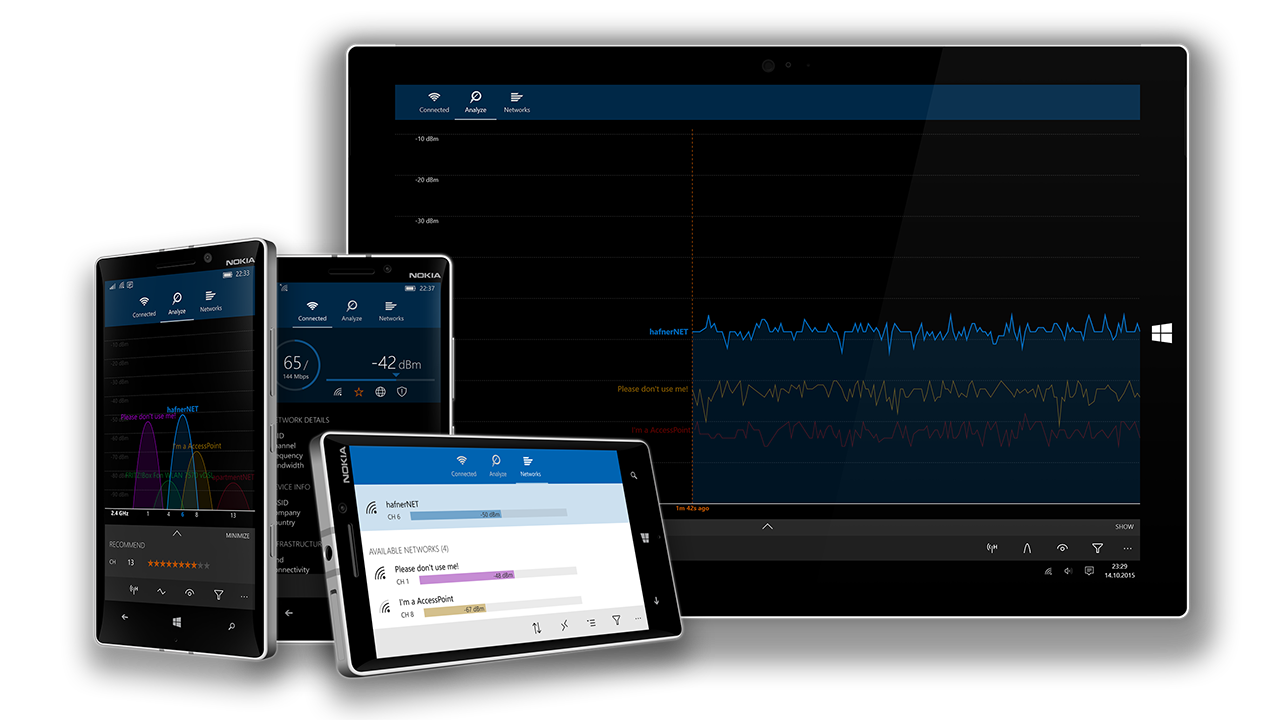
WiFi Analyzer is a free wireless network diagnostic app for Windows 10 and Windows 11. Built by developer Matt Hafner and published through the Microsoft Store, the WiFi Analyzer tool scans every nearby access point and plots their signal strength on real-time channel graphs. Those signature parabola curves make it easy to spot which channels are crowded and which ones are wide open.
The app was built for a specific problem: slow or dropped WiFi caused by channel overlap. If three of your neighbors all broadcast on channel 6, your router is fighting for airtime. WiFi Analyzer shows that interference visually, then rates each channel with a star system so you know exactly where to move your router settings.
Who uses it
Home users troubleshooting dead zones make up the biggest group, but the app has a strong following among IT admins and network technicians too. Reddit communities like r/HomeNetworking and r/sysadmin regularly recommend it as the go-to free WiFi scanner for Windows. It has been featured by Microsoft Support documentation and referenced by hardware vendors including Panasonic.
What you get
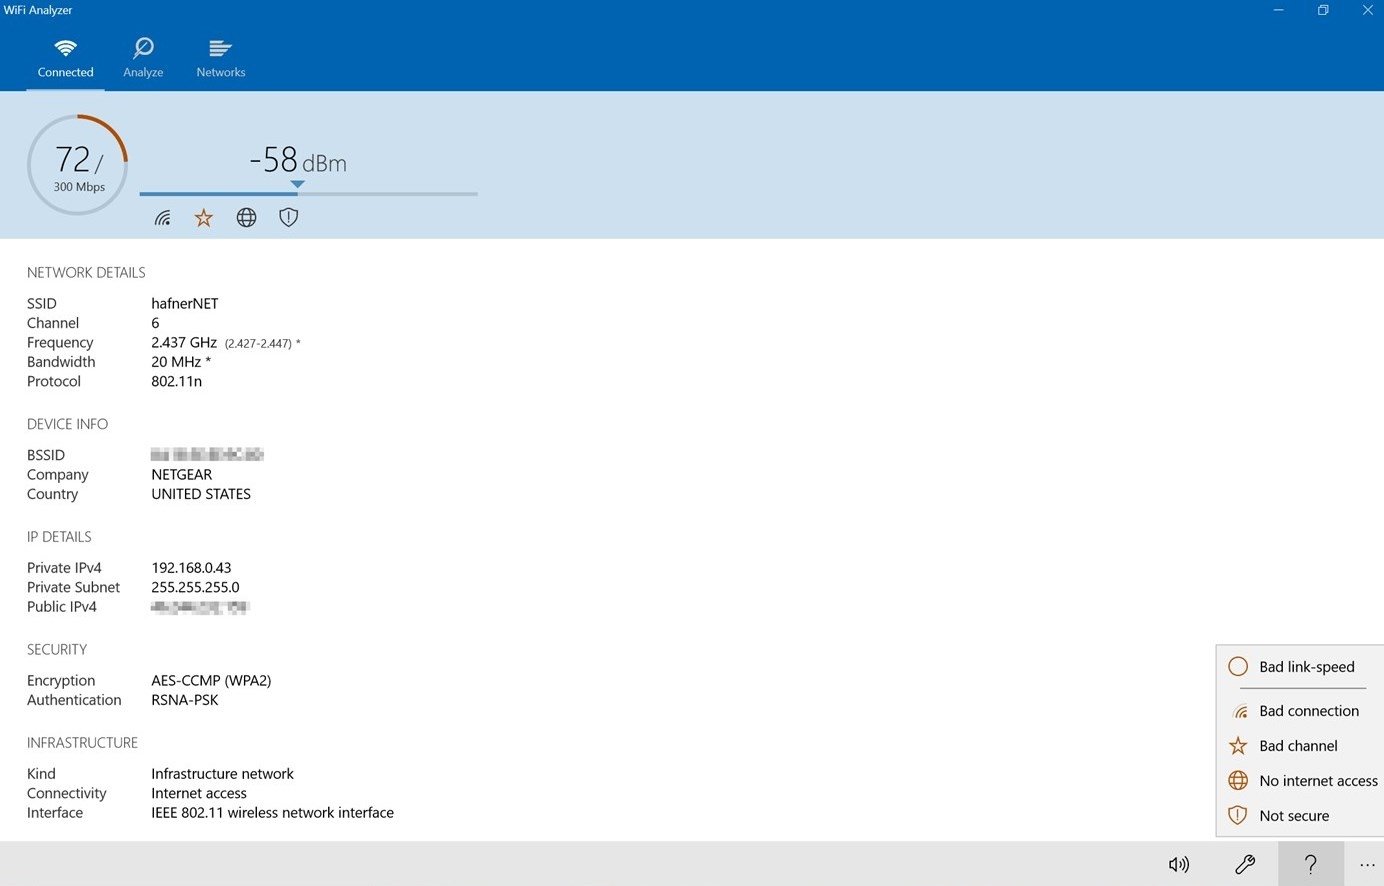
The free version includes everything most people need: a channel analysis graph, a time graph that tracks signal strength as you walk around, a full network list with SSID, BSSID, manufacturer, security type, and dBm readings, plus a signal strength meter. The dashboard gives a quick health overview of your current connection. There is also full support for Wi-Fi 6E and Wi-Fi 7 on the 6 GHz band when running Windows 11, along with WPA3 and 802.11ax/be detection.
A one-time PRO upgrade (around $1.99) adds a signal beeper for hands-free router placement, live-tile support, network connect from the app, and filtering options. The base app is completely ad-free, which is unusual for a free utility.
Ready to see your WiFi environment? Download WiFi Analyzer or jump to features for a full breakdown.
Key features
WiFi Analyzer packs real diagnostic power into a lightweight app. Here is what it actually does.
Channel analysis graph
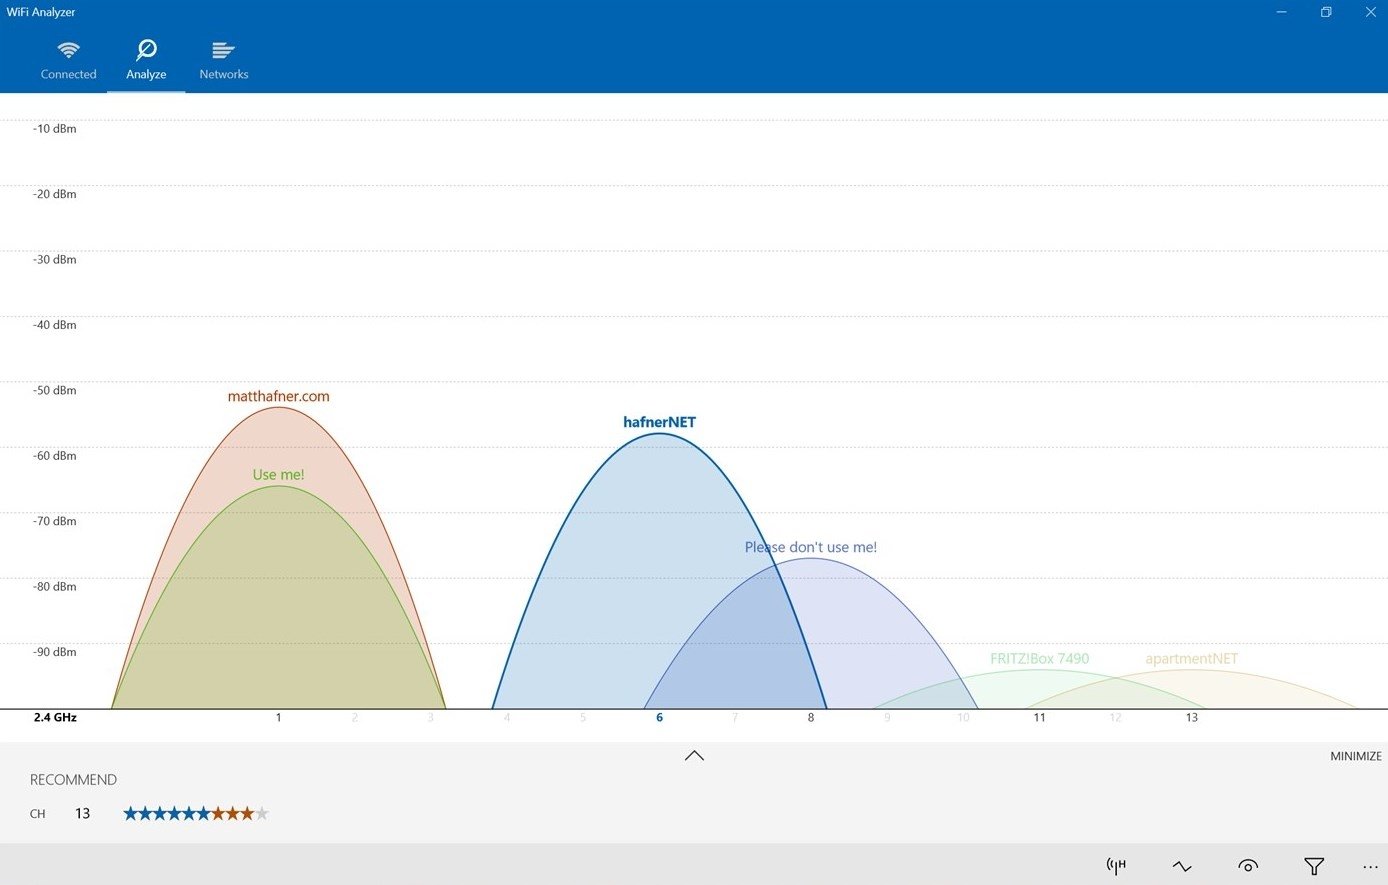
The signature feature. WiFi Analyzer draws parabola-shaped signal curves for every nearby network, plotted by channel number. You can immediately see which channels are crowded and which ones are open. The graph covers 2.4 GHz, 5 GHz, and 6 GHz bands separately, so you get a clean picture of each frequency range without overlap.
Signal strength meter
A dedicated gauge that shows your current connection strength in real-time dBm values. Walk around your house with your laptop and watch the needle move – it is the simplest way to find WiFi dead zones and figure out where your router coverage actually drops off.
Time graph
Tracks signal strength over time as a scrolling line chart. This is useful when you are physically moving your router or adjusting antennas, because you can watch the signal change second by second instead of guessing.
Full network list
Every detected network in one sortable table: SSID, BSSID, manufacturer, security type (WPA2, WPA3, Open), frequency band, channel width, and signal level in dBm. You can sort by any column. It is genuinely useful for troubleshooting – if your neighbor is running an open network on your channel, you will see it here immediately.
Channel star ratings
WiFi Analyzer rates each available channel with a star score based on current congestion. Instead of reading the graph yourself, just look at the ratings and pick the channel with the most stars. It takes the guesswork out of channel selection.
Connection dashboard
A quick health overview of your current WiFi connection. Shows your SSID, IP address, signal quality, link speed, and connection frequency at a glance. Handy for verifying your network settings without opening Windows network properties.
Wi-Fi 6E and 7 support
Full support for 6 GHz band scanning on Windows 11. If you own a Wi-Fi 6E or Wi-Fi 7 router, WiFi Analyzer can scan the newer band and show channel usage there too. Also detects 802.11ax and 802.11be protocol types.
WPA3 security detection
Identifies the security protocol on every network it finds, including WPA3-Personal and WPA3-Enterprise. You can quickly audit whether your own network and your neighbors are using up-to-date encryption.
Dark and light themes
Built-in theme switching with customizable accent colors. The dark theme works well for low-light environments, and the accent color picker lets you match your personal style. A small touch, but one that most free tools skip.
Completely ad-free
No banner ads, no pop-ups, no interstitials. The free version has zero advertising, which is uncommon for WiFi tools. The optional Pro upgrade (~$1.99) adds a signal beeper and live tile support, but the core app never shows ads regardless.
System Requirements
WiFi Analyzer is a lightweight UWP app from the Microsoft Store. It runs on most modern Windows PCs without extra hardware or drivers.
| Component | Minimum | Recommended |
|---|---|---|
| Operating System | Windows 10 v10240.0 or later | Windows 11 (22H2+) 6 GHz |
| Processor | x86 / x64 / ARM (1 GHz+) | Dual-core 1.5 GHz or faster |
| RAM | 1 GB | 2 GB or more |
| Disk Space | ~9 MB installed | 50 MB (with cache and logs) |
| WiFi Adapter | Any 802.11b/g/n adapter | 802.11ax (Wi-Fi 6/6E) adapter Best |
| Display | 1024 x 768 minimum | 1920 x 1080 or higher |
| Internet | Not required for scanning | Required for initial download only |
Already meet the requirements? Download WiFi Analyzer and start scanning.
Download WiFi Analyzer
Get the latest version from the Microsoft Store. WiFi Analyzer installs in seconds and runs without admin privileges on any Windows 10 or 11 PC.
Screenshots
See WiFi Analyzer in action. Browse through these interface screenshots to get a feel for the app before you download it.
Screenshots from WiFi Analyzer v2.8.3 running on Windows 11
Getting Started with WiFi Analyzer
From installation to your first channel scan in under five minutes. Here is everything you need to know to start diagnosing your wireless network.
Downloading WiFi Analyzer
WiFi Analyzer is distributed through the Microsoft Store, which means you do not need to hunt for .exe files or worry about third-party download mirrors. Head to our download section above and click the download button. It will open the Microsoft Store listing directly.
The app weighs in at roughly 1 MB to download and expands to about 9 MB once installed. On a typical broadband connection the whole process takes under 30 seconds. Because it is a UWP (Universal Windows Platform) app, there is no separate 32-bit or 64-bit installer to pick between. The Store delivers the correct package for your hardware automatically.
There is only one version of WiFi Analyzer on the Store. The free download gives you the full base app with zero ads. A one-time PRO upgrade (around $1.99) unlocks extras like the signal beeper, graph labels, and network filtering, but the core scanning and channel analysis features work without paying anything.
Installation Walkthrough
Installing from the Microsoft Store is about as hands-off as it gets. There is no installer wizard, no checkbox screens, and no toolbar bundling. Here is what happens:
- Click “Get” on the Store listing. If you have never installed this app before, the button says “Get.” If you have, it says “Install.” Either way, one click starts the download.
- Wait for the progress ring. A small circular progress indicator replaces the button. The download is small enough that on most connections it finishes before you can alt-tab away.
- The button changes to “Open.” Once the download and installation complete, you will see an “Open” button. Click it to launch WiFi Analyzer for the first time.
That is the entire installation process. No restart needed. No SmartScreen warning because the app is signed and delivered directly through Microsoft’s own Store infrastructure.
After the first launch, WiFi Analyzer appears in your Start menu and can be pinned to the taskbar. The app does not install any background services or startup entries. It only runs when you open it.
If the Store is blocked or unavailable (some corporate machines disable it), you can ask your IT admin to deploy WiFi Analyzer through Microsoft Intune or the Microsoft Store for Business. There is no standalone .exe or .msi installer available.
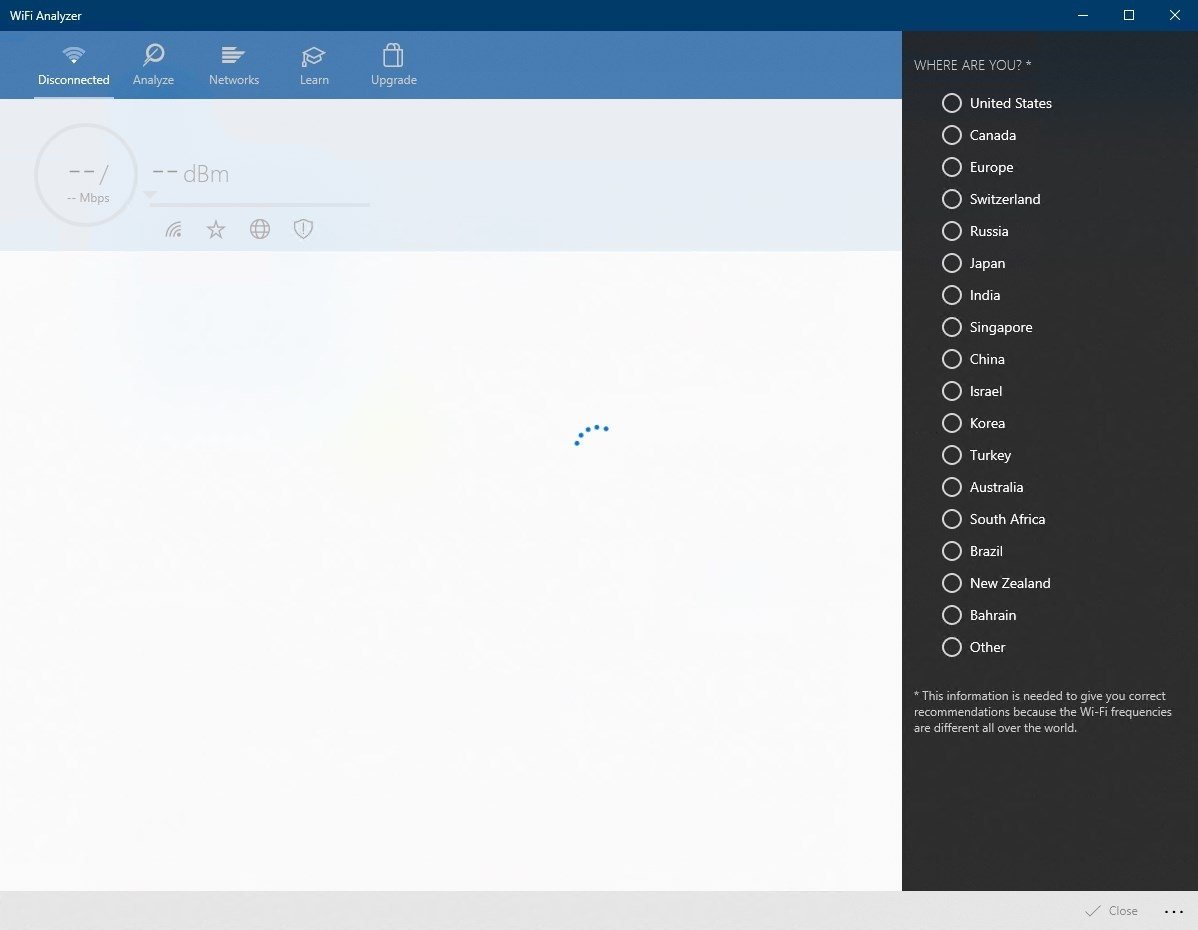
Initial Setup and Configuration
WiFi Analyzer does not have a first-run wizard. It opens straight to the Connected tab, which shows a dashboard of your current WiFi connection. But before you see any data, there is one important permission to grant.
Location access is required. Windows requires apps to have location permission before they can scan WiFi networks (since WiFi signals can reveal your physical location). If you see an error like “Access to Wi-Fi adapter denied by system/user,” here is how to fix it:
- Windows 11: Open Settings > Privacy & security > Location. Turn on both the main “Location services” toggle and the per-app toggle for WiFi Analyzer.
- Windows 10: Open Settings > Privacy > Location. Enable “Allow apps to access your location” and scroll down to make sure WiFi Analyzer is toggled on.
You should also check Settings > Privacy > Radios and confirm the global switch and WiFi Analyzer’s individual toggle are both enabled. Without radios access, the app cannot communicate with your WiFi adapter.
Once permissions are set, open Settings from the three-dot menu (bottom-right corner of the app) to configure your preferences:
- Theme: Choose between Dark, Light, or Auto. Then pick a color scheme: Triad (three-color), Complementary, or Accent (uses your Windows accent color).
- Adapter: If your PC has multiple WiFi adapters (built-in plus a USB dongle), select the one you want to use.
- Graphs > Show graphs as trapezoid: Toggle this if you prefer physically accurate trapezoid shapes instead of the default parabolas.
- Networks > Sort network list automatically: Enable this to keep the strongest signals at the top without manual sorting.
Your First Channel Scan
Let’s walk through the main reason people use WiFi Analyzer: finding the best WiFi channel for your router.
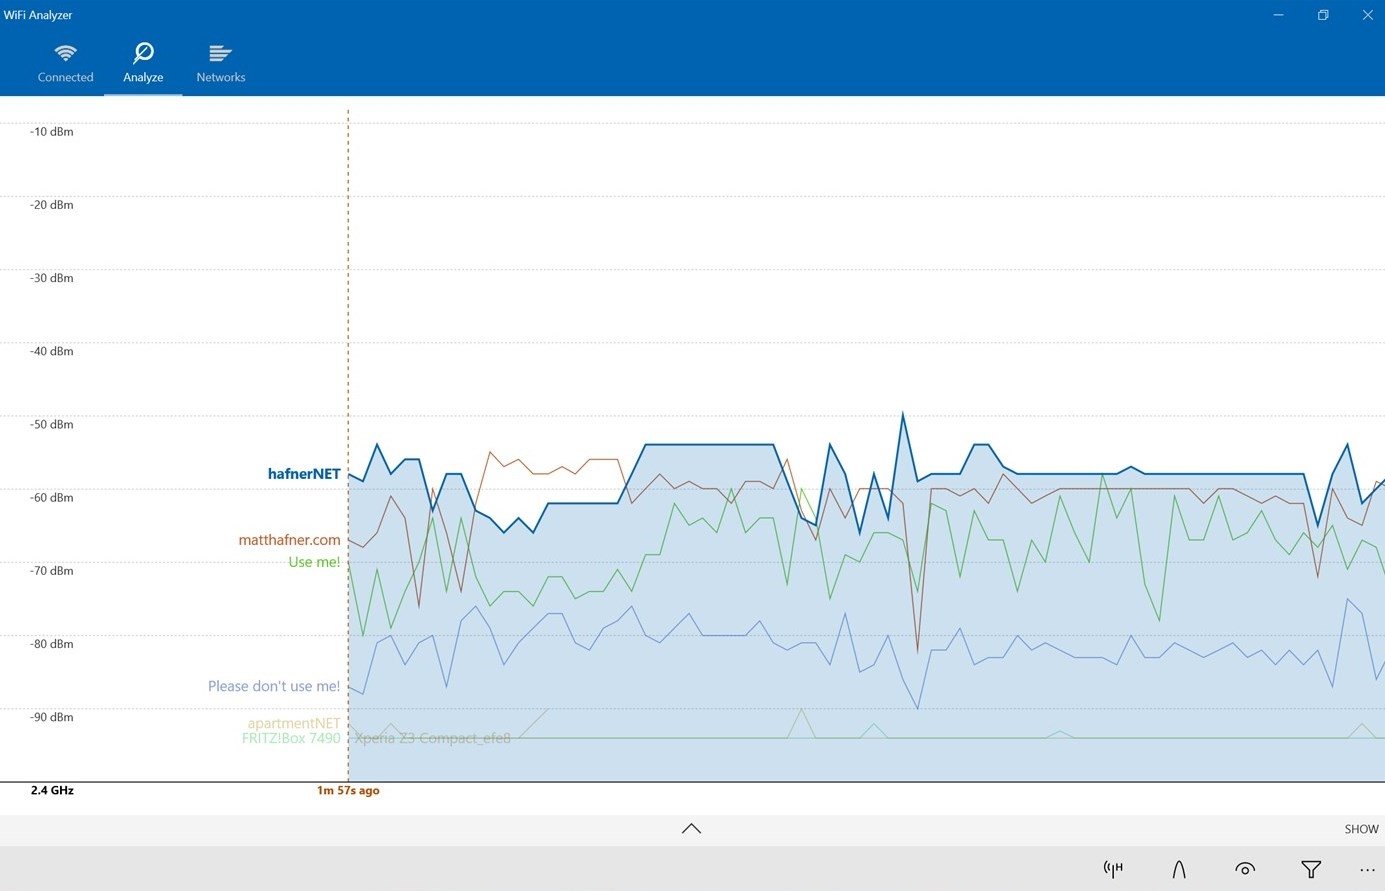
Step 1: Open the Analyze tab. Tap or click the middle tab at the top labeled “Analyze.” You will see the Momentary Graph (also called the Channel Graph). Each WiFi network appears as a parabola-shaped curve. The taller the curve, the stronger the signal. Your connected network has a thicker line so you can spot it immediately.
Step 2: Read the graph axes. The horizontal axis shows channel numbers (highlighted in yellow). The vertical axis shows signal strength in dBm (orange labels). Stronger signals sit higher on the graph. If you see several curves piled on top of each other over the same channels, those networks are competing for airtime and causing interference.
Step 3: Switch between bands. Near the top of the graph you will see buttons for 2.4 GHz and 5 GHz (and 6 GHz on Windows 11 with WiFi 6E hardware). Tap the band you want to inspect. The 2.4 GHz band has fewer channels and tends to be more crowded. The 5 GHz band offers more channels and less overlap.
Step 4: Check the channel ratings. Tap the up arrow near the bottom of the Analyze page to expand the channel ratings panel. Each available channel gets a star rating based on how much interference it has. Look for the channel with the highest rating. That is the one you should switch your router to.
Step 5: Change your router’s channel. Log into your router’s admin panel (usually at 192.168.1.1 or 192.168.0.1 in a browser). Navigate to the wireless settings and change the channel to the one WiFi Analyzer recommended. Save, and give it a minute to apply.
Using the Time Graph for dead zones: Switch to the Time Graph (use the view toggle on the Analyze tab). Then walk around your home or office with your laptop. The graph plots signal strength over time, so you will see the line dip as you move into weaker spots. Mark those areas as candidates for a WiFi extender or mesh node.
Here is a quick reference for interpreting signal strength readings:
| dBm Range | Signal Quality | What to Expect |
|---|---|---|
| -30 to -50 | Excellent | Full speed, no drops. You are close to the router. |
| -50 to -60 | Good | Reliable for video calls and streaming. |
| -60 to -70 | Fair | Browsing works fine, but large downloads may slow down. |
| -70 to -80 | Weak | Frequent buffering. Consider moving closer or adding coverage. |
| Below -80 | Unusable | Connections drop constantly. Out of practical range. |
Tips, Tricks, and Best Practices
Use the signal beeper for site surveys. If you upgrade to PRO, the beeper feature produces faster beeps as signal strength increases. This lets you walk around and listen for dead zones without staring at your screen. You can adjust the beeper volume independently from system volume in Settings.
Check both bands separately. A common beginner mistake is only looking at the 2.4 GHz graph. Your router probably broadcasts on both 2.4 and 5 GHz. Check each band in the Analyze tab. In apartments, the 2.4 GHz band is typically overcrowded while the 5 GHz band has plenty of open channels.
Watch the Connected tab health indicators. The dashboard shows four symbols: WiFi signal, star (channel optimization), globe (internet connectivity), and shield (encryption). Each one lights up in color when something needs attention. If the star symbol is colored, that means overlapping networks are degrading your connection and you should consider switching channels.
Link speed vs. actual speed. The Connected tab shows two numbers for link speed: your current negotiated rate (large number) and the theoretical maximum (small number). Anything above 50% of the maximum is solid performance. If the ratio drops below that, interference or distance is the likely cause.
Less obvious features: Enable “More colors” in the view options on the Analyze tab to color-code only overlapping networks, making it easier to spot conflicts. Under Settings > Graphs, you can adjust “Maximum graph time” to extend the Time Graph’s history for longer walking surveys. And under Settings > Performance, lowering “Processed networks per channel” can speed up the app on older laptops that struggle with crowded environments.
Where to get help: The developer maintains detailed help pages at matthafner.com/wifi-analyzer/help covering graphs, settings, error messages, and the changelog. For community discussion, check r/HomeNetworking and r/sysadmin on Reddit, where WiFi Analyzer is one of the most frequently recommended tools. Updates arrive automatically through the Microsoft Store.
Ready to scan? Download WiFi Analyzer and find the best channel for your network.
Frequently Asked Questions
Answers to the most common questions about WiFi Analyzer, from installation to advanced channel optimization.
Is WiFi Analyzer safe to download?
Yes, WiFi Analyzer is safe. The app is published on the Microsoft Store by Matt Hafner and has been available since July 2015. Microsoft reviews all Store submissions for malware and policy compliance before listing them, so the app goes through automated security scanning before each update.
WiFi Analyzer has over 2,780 ratings on the Microsoft Store with a 4.1 out of 5 star average. The app weighs roughly 1 MB to download and about 9 MB installed. It requests access to your WiFi adapter and location services (needed to scan nearby networks under Windows regulations), but it does not collect personal data or transmit anything to external servers. The base version is completely ad-free, which is unusual for free utility apps.
One thing to watch out for: third-party download sites sometimes bundle WiFi Analyzer clones with adware. The only official source is the Microsoft Store listing by Matt Hafner (Store ID: 9NBLGGH33N0N). If you downloaded a .exe file from a random website, that is not the real WiFi Analyzer.
Pro tip: You can verify the publisher before installing by checking the “More info” section on the Microsoft Store page. The publisher should show “WiFi Tools” by Matt Hafner.
For the official download link, head to our download section.
Is WiFi Analyzer free from malware and spyware?
WiFi Analyzer contains no malware, spyware, or adware. The app is distributed exclusively through the Microsoft Store, where Microsoft runs automated security scans on every submitted package. The developer, Matt Hafner, has maintained the app since 2015 without any reported security incidents.
The app uses a UWP (Universal Windows Platform) sandboxed environment, which limits what it can access on your system. It can read WiFi adapter data and location info (required for network scanning on Windows 10 and 11), but it cannot access your files, browser history, or other personal data. The free version has zero advertisements, so there is no ad-tracking SDK bundled in.
- No data collection or telemetry beyond standard Microsoft Store analytics
- No internet connection required for the app to function (it scans local radio signals)
- No background processes after you close the app (a previous issue with Live Tile on Windows 11 was fixed in v2.8.3)
- Source is not open-source, but the UWP sandbox prevents file system or registry access
Pro tip: If Windows SmartScreen or your antivirus flags the app, it is almost certainly a false positive from heuristic scanning. The Microsoft Store version is digitally signed by Microsoft.
Check the full feature list to see exactly what WiFi Analyzer does and does not do.
Where is the official safe download for WiFi Analyzer?
The only official source for WiFi Analyzer is the Microsoft Store. The app is listed under Store ID 9NBLGGH33N0N, published by “WiFi Tools” (Matt Hafner). There is no standalone .exe installer or third-party download mirror that is authorized by the developer.
You can find it by opening the Microsoft Store app on Windows 10 or 11 and searching “WiFi Analyzer.” Look for the one with the blue WiFi signal icon and the publisher name “WiFi Tools.” There are several similarly-named apps on the Store, so double-check the publisher before installing. The correct app has been downloaded millions of times and has 2,780+ ratings.
- Open the Microsoft Store on your Windows PC
- Search for “WiFi Analyzer”
- Verify the publisher is “WiFi Tools” by Matt Hafner
- Click “Get” or “Install” to download (about 1 MB)
- The app appears in your Start menu after installation
Pro tip: You can also open the Store page directly by visiting the Microsoft Store link in a browser and clicking “Get in Store app,” which launches the Store to the correct listing automatically.
We link directly to the official Microsoft Store listing in our download section.
Does WiFi Analyzer work on Windows 11?
Yes, WiFi Analyzer has full support for Windows 11. The latest version (v2.8.3, released August 2025) includes specific fixes and improvements for Windows 11, including support for the 6 GHz band used by Wi-Fi 6E and Wi-Fi 7 routers.
On Windows 11, WiFi Analyzer can detect and display networks across all three frequency bands: 2.4 GHz, 5 GHz, and 6 GHz. The app uses Windows 10/11 UWP APIs for network scanning, so it works natively without compatibility mode or workarounds. Windows 11 users benefit from improved 6 GHz channel visibility, which older WiFi tools often miss entirely.
Some Windows 11 users on Reddit have reported occasional issues where the app shows no networks. This is almost always caused by one of these things:
- Location services are turned off (Windows requires location access for WiFi scanning since version 1903)
- The WiFi adapter driver is outdated or corrupted after a Windows update
- The Microsoft Store app needs a reinstall after a major Windows 11 feature update
Pro tip: After a major Windows 11 update (like 23H2 or 24H2), go to Settings > Privacy > Location and confirm the toggle is on. Then try restarting WiFi Analyzer. This fixes the “no networks found” problem 9 times out of 10.
Check system requirements for the full hardware and OS compatibility list.
Does WiFi Analyzer work on Mac or Linux?
No. WiFi Analyzer by Matt Hafner is a Windows-only app. It is built on the Universal Windows Platform (UWP) and distributed through the Microsoft Store, so there are no macOS or Linux versions available. The developer has confirmed on the official FAQ that Apple does not provide the necessary APIs for a comparable iOS version, and the same limitation applies to macOS.
If you need WiFi analysis on other platforms, there are solid alternatives:
- macOS: NetSpot (free tier available) provides channel graphs and heatmap surveys. The built-in Wireless Diagnostics tool (hold Option and click the WiFi icon) also shows channel and signal data
- Linux: LinSSID is a free graphical WiFi scanner similar to WiFi Analyzer. Wavemon is a terminal-based option. The
iwlist scancommand also works for quick checks - Android: WiFi Analyzer by farproc (different developer) is the most popular free option on Google Play, with similar channel graphs
WiFi Analyzer for Windows requires Windows 10 version 10240.0 or later. It also runs on HoloLens and Surface Hub devices, though those are niche use cases.
Pro tip: If you have a Windows laptop and a Mac, run WiFi Analyzer on the Windows machine while walking around your space. The Time Graph view tracks signal strength over time as you move, which works exactly the same regardless of which computer connects to the network afterward.
See the system requirements section for detailed OS compatibility.
What are the minimum system requirements for WiFi Analyzer?
WiFi Analyzer needs Windows 10 (version 10240.0 or later) and a working WiFi adapter. Those are the only hard requirements. The app is tiny: about 1 MB download size and roughly 9 MB installed.
The app runs on the UWP platform, so it works on any architecture that supports Windows 10 or 11, including x86, x64, and ARM processors. It has been confirmed to work on Surface Pro tablets, standard laptops, and even the Surface Hub and HoloLens. Since the app barely uses any CPU or RAM (it just reads WiFi scan data from the OS), there is no practical minimum for processor speed or memory. If your device runs Windows 10, it can run WiFi Analyzer.
- OS: Windows 10 v10240.0+ or Windows 11 (any version)
- WiFi adapter: Any adapter with a working Windows driver
- Disk space: ~9 MB installed
- RAM: No specific minimum (the app uses under 50 MB)
- For 6 GHz scanning: Windows 11 with a Wi-Fi 6E or Wi-Fi 7 capable adapter
One important note: the app will not work on Windows 8.1 or earlier. Matt Hafner has explained on the official FAQ that the WiFi scanning APIs were introduced with the Windows 10 UWP app model and do not exist on older Windows versions.
Pro tip: If you have an older USB WiFi adapter that does not support 5 GHz, the app will still work but only show 2.4 GHz networks. Upgrade to a dual-band or tri-band USB adapter if you need full coverage.
Visit our system requirements section for the complete compatibility table.
Is WiFi Analyzer completely free to use?
The base version of WiFi Analyzer is 100% free, with no ads, no trial period, and no feature nag screens. You get full access to the Channel Graph, Time Graph, Network List, Signal Strength meter, and the star rating channel recommendation system without paying anything.
There is a PRO upgrade available as a one-time in-app purchase for approximately $1.99 USD. The PRO version adds a few extra features: Live-Tile support (Windows 10 only), a signal strength beeper for finding optimal router placement by ear, the ability to connect to networks directly from the app, custom filters, screen timeout prevention, and locked screen rotation. None of these are necessary for basic WiFi analysis.
The free version covers everything most home users need: scanning nearby networks, seeing which channels are crowded, checking signal strength in different rooms, and identifying interference. Commercial use is also allowed with the free version. Matt Hafner has confirmed this on the official FAQ.
Your license covers up to 10 Windows devices per Microsoft account. If you buy the PRO upgrade on one device, you get it on all your other Windows devices signed into the same account.
Pro tip: The signal strength beeper in the PRO version is worth the $1.99 if you are trying to find the best spot for your router. It gives you audio feedback as you move the laptop around, so you do not have to keep staring at the screen.
See the full feature breakdown comparing free and PRO capabilities.
What is the difference between WiFi Analyzer free and the PRO version?
The free version includes all core analysis features. The PRO upgrade ($1.99 one-time) adds convenience features that power users and IT professionals will appreciate, but casual users can skip without missing much.
Here is the full breakdown:
- Free version: Channel Graph with parabola signal curves, Time Graph for tracking signal over time, full Network List with SSID/BSSID/manufacturer/security/signal data, Signal Strength meter, Dashboard with connection health overview, star rating for channel recommendations, dark and light themes, Wi-Fi 6E/7 support (6 GHz band on Windows 11), WPA3 and 802.11ax/be detection
- PRO upgrade adds: Live-Tile with signal data on Start menu (Windows 10 only, deprecated on Windows 11), signal beeper with audio feedback for router placement, connect to scanned networks from inside the app, custom filters to hide/show specific networks, prevent screen timeout during extended scans, lock screen rotation, display SSID/BSSID labels directly on graph curves
The PRO purchase is a one-time payment through the Microsoft Store, not a subscription. It transfers to all Windows devices (up to 10) signed into your Microsoft account. There are no ads in either version.
Pro tip: If you bought the PRO upgrade on a different device and it is not showing up on your current PC, make sure you are signed into the Microsoft Store with the same Microsoft account. Go to the app’s Store page and it should show “Owned” instead of a price.
Check our features section for a detailed look at what each tier includes.
How do I download and install WiFi Analyzer step by step?
Installing WiFi Analyzer takes about 30 seconds. The app is distributed through the Microsoft Store, so there is no manual installer, no setup wizard, and no bundled software to decline.
- Open the Microsoft Store app on your Windows 10 or 11 PC (press the Windows key and type “Microsoft Store”)
- Search for “WiFi Analyzer” in the search bar
- Find the listing by “WiFi Tools” (Matt Hafner) with 2,780+ ratings
- Click “Get” or “Install” – the download is about 1 MB
- Wait a few seconds for installation to finish
- Open the app from the Start menu or by clicking “Open” in the Store
- Allow location access when prompted (required for WiFi scanning on Windows)
On first launch, the app immediately starts scanning for nearby WiFi networks. You will see the Channel Graph view by default, showing parabola-shaped signal curves for each detected network. The graph makes it easy to spot which channels are crowded and which are open.
If the Microsoft Store gives you an error during installation, the most common fix is resetting the Store cache. Press Windows+R, type wsreset.exe, and press Enter. Wait for the Store to reopen, then try the install again.
Pro tip: Pin the app to your taskbar after installing. WiFi conditions change throughout the day as neighbors turn devices on and off, so checking periodically gives you a better picture than a single scan.
Our getting started guide walks through the full setup including recommended settings.
How to fix WiFi Analyzer installation errors on Windows?
Most installation errors come from the Microsoft Store itself, not from WiFi Analyzer. The Store can fail to download or install apps when its cache is corrupted, your Windows version is too old, or your Microsoft account session has expired.
Try these fixes in order:
- Reset the Store cache: Press Windows+R, type
wsreset.exe, press Enter. A blank command window opens for about 10 seconds, then the Store relaunches. Try installing again. - Check your Windows version: WiFi Analyzer requires Windows 10 version 10240 or later. Go to Settings > System > About and check your “OS build.” If it is below 10240, you need to update Windows first.
- Sign out and back into the Store: Click your profile icon in the Store app, sign out, restart the Store, and sign back in.
- Run the Windows Store troubleshooter: Go to Settings > Update & Security > Troubleshoot > Additional troubleshooters > Windows Store Apps.
- Re-register Store apps: Open PowerShell as administrator and run
Get-AppxPackage -allusers Microsoft.WindowsStore | Foreach {Add-AppxPackage -DisableDevelopmentMode -Register "$($_.InstallLocation)\AppXManifest.xml"}
If you see error code 0x80131500, this usually means your internet connection to Microsoft servers is blocked. Check your firewall or VPN settings. If you see 0x80070005, run the Store as administrator or check that Windows Update is not mid-installation.
Pro tip: On corporate networks, the IT department sometimes blocks Microsoft Store access via Group Policy. If you are on a work laptop and cannot install Store apps, ask your IT admin to whitelist the WiFi Analyzer app ID (9NBLGGH33N0N).
Once installed, head to our getting started guide for first-run configuration.
Why does WiFi Analyzer show no networks found?
The “no networks found” error is the most commonly reported issue with WiFi Analyzer. In nearly all cases, it is caused by Windows location services being disabled, not by a problem with the app itself.
Starting with Windows 10 version 1903, Microsoft requires apps to have location access permission before they can scan WiFi networks. This is a privacy regulation, not a WiFi Analyzer limitation. If location is off, the app cannot see any networks even though your PC is connected to WiFi just fine.
- Go to Settings > Privacy > Location (on Windows 11: Settings > Privacy & security > Location)
- Make sure “Location services” is turned ON
- Scroll down and confirm WiFi Analyzer has permission to access location
- Restart the app
If location is already on and you still see nothing:
- Check that your WiFi adapter is enabled in Device Manager (Network adapters section). Try disabling and re-enabling it.
- Update your WiFi adapter driver. After major Windows updates, drivers sometimes need a refresh.
- Uninstall and reinstall WiFi Analyzer from the Microsoft Store.
- Make sure airplane mode is off.
Pro tip: If you recently updated to Windows 11 24H2, the location permission gets reset for some UWP apps. Go check the location setting even if you are sure you enabled it before.
For more troubleshooting steps, see the getting started guide.
WiFi Analyzer says Wi-Fi adapter not found – how to fix?
This error means Windows is not detecting a working WiFi adapter on your machine. The app relies on the operating system to communicate with the wireless hardware, so if Windows does not see the adapter, neither can WiFi Analyzer.
Common causes and fixes:
- Adapter is disabled: Open Device Manager, expand “Network adapters,” right-click your WiFi adapter, and select “Enable device.” If it says “Disable device,” the adapter is already enabled and the issue is elsewhere.
- Driver problem: Right-click the WiFi adapter in Device Manager and select “Update driver.” If that does not help, go to the manufacturer website (Intel, Realtek, Qualcomm, etc.) and download the latest driver manually.
- Hardware switch: Some laptops have a physical WiFi switch or a keyboard shortcut (often Fn+F2 or Fn+F12) that toggles the wireless radio. Make sure it is turned on.
- Airplane mode: Check the Windows system tray for airplane mode. Even if you did not enable it, Windows updates sometimes toggle it on.
- USB adapter disconnected: If you use an external USB WiFi adapter, try a different USB port. USB 3.0 ports can sometimes interfere with 2.4 GHz signals, so try a USB 2.0 port if available.
On desktop PCs without built-in WiFi, you need either a PCIe WiFi card or a USB WiFi adapter. WiFi Analyzer cannot work with Ethernet-only connections because it specifically reads wireless radio data.
Pro tip: After installing a new WiFi driver, reboot your PC before opening WiFi Analyzer. Some drivers do not fully initialize until after a restart.
Review the system requirements to confirm your hardware is compatible.
Why are networks shown outside the graph in WiFi Analyzer?
Networks appear outside the visible graph area when the app’s region setting does not match your actual location. WiFi frequencies and allowed channels vary by country. Japan allows channels 1 through 14 on 2.4 GHz, while the US stops at channel 11. If your region is set to US but a nearby router uses channel 13, its signal curve lands outside the graph boundaries.
To fix this, open the app settings (gear icon) and check the region dropdown. Set it to the country you are physically in. The channel graph will redraw to show the correct frequency range for your region.
This is a common issue for users who:
- Bought a laptop abroad and the Windows locale defaults to a different country
- Live near a border where routers from the neighboring country use different channels
- Have the app set to “Auto” but Windows reports the wrong region
The developer, Matt Hafner, addresses this directly on the official FAQ page. The fix takes about 5 seconds once you know where the setting is.
Pro tip: If you travel frequently, change the region setting each time you arrive somewhere new. This ensures the channel graph always shows the full legal frequency range for that location.
Learn more about reading the graphs in our getting started guide.
How to update WiFi Analyzer to the latest version?
WiFi Analyzer updates through the Microsoft Store automatically. If auto-updates are enabled on your PC, you should get new versions within a day or two of release without doing anything. The latest version is v2.8.3, released on August 25, 2025.
To manually check for updates:
- Open the Microsoft Store app
- Click “Library” in the bottom-left sidebar (or the download icon)
- Click “Get updates” in the top-right corner
- If an update is available for WiFi Analyzer, it will download and install
To verify which version you have installed, open WiFi Analyzer, click the gear icon (Settings), and look for the version number. If it shows 2.8.3 or later, you are up to date.
The v2.8.3 update fixed an issue where the app was running in the background and using location services because of the Live-Tile feature, which is no longer supported on Windows 11. Earlier versions could drain battery on laptops because of this background activity. If you are running an older version, updating is strongly recommended.
Pro tip: Enable auto-updates in the Microsoft Store by going to Settings (gear icon in the Store app) and toggling “App updates” on. This way you never have to remember to check manually.
For the current version download, visit our download section.
What is new in WiFi Analyzer v2.8.3?
Version 2.8.3 (August 25, 2025) primarily fixed the background running issue that affected Windows 11 users. The Live-Tile feature, which displayed signal data on the Start menu tile, triggered background location access even when the app was closed. Since Windows 11 dropped support for live tiles, the feature was disabled, which stopped the unnecessary background activity and location usage.
Other changes across recent versions include:
- Improved Wi-Fi 6E (6 GHz band) scanning support for Windows 11
- WPA3 and 802.11ax/be protocol detection in the network list
- Better handling of Wi-Fi 7 (802.11be) networks that use wider 320 MHz channels
- Dark and light theme improvements with customizable accent colors
- Performance improvements for the channel graph rendering
The app has been available since July 2015 and has gone through many incremental updates. Major feature additions have included 5 GHz band support, the star rating channel recommendation system, and 6 GHz band support as Wi-Fi 6E routers became more common.
Pro tip: After updating, do a fresh scan and compare the results to what you remember. Sometimes a new version detects networks that the old version missed, especially on the 5 GHz and 6 GHz bands where driver compatibility improvements can make a difference.
Download the latest version from our download section.
WiFi Analyzer vs NetSpot – which is better?
They solve different problems. WiFi Analyzer is a quick, free channel scanner for finding the best WiFi channel and checking signal strength. NetSpot is a full WiFi survey tool with heatmap generation, floor plan mapping, and site planning. For home users who need a fast check, WiFi Analyzer wins. For IT professionals who need to map WiFi coverage across an office building, NetSpot wins.
Key differences:
- Price: WiFi Analyzer is free (PRO upgrade $1.99). NetSpot has a free “Discover” mode but charges $49+ for survey features and $149+ for the Pro tier.
- Platform: WiFi Analyzer is Windows-only. NetSpot runs on Windows and macOS.
- Heatmaps: WiFi Analyzer has no heatmap feature. NetSpot generates detailed signal heatmaps on uploaded floor plans.
- Channel analysis: WiFi Analyzer has its signature parabola curve channel graph, which visually shows overlap. NetSpot shows channel usage in a table format.
- Speed: WiFi Analyzer launches instantly and starts scanning. NetSpot takes longer to load and configure, especially in survey mode.
- 6 GHz support: Both support 2.4, 5, and 6 GHz bands on compatible hardware.
A common approach on Reddit (r/HomeNetworking, r/sysadmin) is to use WiFi Analyzer for a quick channel check at home and NetSpot when you need to troubleshoot coverage across a larger space. Many IT professionals keep both installed.
Pro tip: If you just need to pick the best channel for your home router, WiFi Analyzer does the job in 15 seconds. The star rating system tells you which channel has the least interference without any configuration.
See WiFi Analyzer’s full capabilities in our features section.
What are the best free alternatives to WiFi Analyzer?
Several free WiFi scanning tools exist for Windows, each with different strengths. WiFi Analyzer by Matt Hafner remains the most popular free option on the Microsoft Store, but here are the top alternatives:
- WinFi Lite: Free on the Microsoft Store. More detailed than WiFi Analyzer, with tabbed views for signal, spectrum, parameters, and security. Great for power users who want granular data. The interface can feel overwhelming compared to WiFi Analyzer’s simplicity.
- NirSoft WifiInfoView: Free portable tool (no install needed). Shows all detected networks in a simple table with SSID, MAC, channel, signal, security. No graphs, but very lightweight at under 200 KB. Good for quick checks from a USB drive.
- Acrylic Wi-Fi Home: Free version scans and lists networks with channel overlap visualization. The paid version adds packet sniffing and traffic analysis. Available for Windows only.
- NetSpot Free: The free “Discover” mode lists nearby networks with basic details. The paid tiers ($49+) add heatmaps and site surveys. Available on Windows and macOS.
- WiFiMan by Ubiquiti: Free on the Microsoft Store. Includes AR-based signal mapping on mobile. Simpler than WiFi Analyzer but backed by a major networking company.
For home users, WiFi Analyzer and WinFi Lite cover 95% of what you need. WiFi Analyzer is easier to read at a glance thanks to its parabola channel graph. WinFi gives more raw data if you know what to do with it.
Pro tip: NirSoft WifiInfoView is the best option for running from a USB stick on machines where you cannot install Store apps. It works without administrator privileges on most systems.
Compare these tools against WiFi Analyzer’s capabilities in our features section.
How do I use WiFi Analyzer to find the best channel for my router?
Open WiFi Analyzer and go to the Channel Graph tab. The parabola-shaped curves represent each nearby WiFi network, positioned on the channel they use. The taller the curve, the stronger that network’s signal. Channels with overlapping curves mean interference.
For 2.4 GHz networks, the rules are straightforward. Only channels 1, 6, and 11 are non-overlapping, so you should pick whichever of these three has the least and weakest curves around it. Using a channel between them (like 3, 4, 8, or 9) actually causes more interference because of how 2.4 GHz channels overlap, even if the graph makes those channels look empty.
For 5 GHz networks, there are many more non-overlapping channels, so you have more options. Look for a channel with no nearby curves or only weak ones.
- Open WiFi Analyzer and select the Channel Graph tab
- Look at the 2.4 GHz view first. Note which of channels 1, 6, and 11 has the fewest and weakest curves
- Check the star rating at the top of the graph – WiFi Analyzer rates each channel with 1-5 stars based on congestion
- Switch to 5 GHz and do the same analysis
- Log into your router (usually 192.168.1.1 or 192.168.0.1) and change the WiFi channel from “Auto” to the best one you identified
- Wait 30 seconds for the router to restart wireless, then rescan in WiFi Analyzer to confirm
Pro tip: Run the scan at different times of day. Your neighbor’s interference pattern at 2pm is different from 10pm when everyone is streaming. The Time Graph view helps track this over a longer period.
Our getting started guide has a full walkthrough of reading each graph type.
Can WiFi Analyzer measure internet speed or do a speed test?
No. WiFi Analyzer does not include an internet speed test or ping tool. The app focuses exclusively on WiFi radio signal analysis: channel usage, signal strength, network detection, and interference mapping. This is a deliberate design choice by the developer, not a missing feature.
The distinction matters: WiFi Analyzer measures the quality of your wireless connection between your device and the router (signal strength in dBm, channel congestion, link speed). An internet speed test measures throughput between your router and your ISP’s servers. You can have a perfect WiFi signal and still have slow internet if your ISP plan is slow, or fast internet with poor WiFi if your router is in a bad spot.
For speed testing alongside WiFi Analyzer, use one of these:
- Microsoft Network Speed Test: Free on the Microsoft Store. Made by Microsoft, clean and simple
- Speedtest by Ookla: The most widely used speed test. Available as a Store app or at speedtest.net
- Fast.com: Netflix’s speed test. Works in any browser, no app needed
The Link Speed shown in WiFi Analyzer’s network details is not an internet speed measurement. It shows the negotiated connection rate between your adapter and the router (e.g., 866 Mbps on a WiFi 5 AC connection). Your actual throughput will be lower due to protocol overhead and shared bandwidth.
Pro tip: Run a speed test while watching the Time Graph in WiFi Analyzer. If the signal graph is steady but your speed test shows poor results, the bottleneck is your internet plan, not your WiFi.
Learn about all WiFi Analyzer capabilities in our features section.
How to use the signal strength beeper to find the best router placement?
The signal strength beeper is a PRO feature ($1.99 in-app purchase) that plays an audio tone that changes pitch based on WiFi signal strength. Stronger signal produces a higher pitch, weaker signal drops the pitch lower. This lets you find the best router position without constantly looking at the screen.
Here is how to use it effectively:
- Buy and activate the PRO upgrade in the app (one-time purchase)
- Open WiFi Analyzer and go to the Signal Strength tab
- Tap the beeper icon (speaker symbol) to enable audio feedback
- Select your home network from the list so the beeper tracks that specific SSID
- Walk around your home or office with the laptop. The pitch rises as signal gets stronger and falls as it weakens
- Note which rooms or corners have the lowest pitch (weakest signal)
- Try different router positions and repeat the walk to compare
This approach is faster than watching the Time Graph because you get instant audio feedback while your eyes stay on where you are walking. IT professionals who set up office WiFi particularly like this feature for quickly identifying dead zones without carrying a clipboard.
For the most accurate results, hold the laptop at desk height (where you normally use it) rather than above your head. WiFi signal propagation changes with height, furniture, and walls. The beeper gives you signal data at the exact position you would actually use the device.
Pro tip: Turn your laptop volume up and close other apps that make sound. In noisy environments, use headphones so you can hear the pitch changes clearly.
See all PRO features in our features section.